
AD*This post and shop widgets contains affiliate links see disclaimer .
I love how a tv panelled feature wall looks. The television has been a home staple since the mid-20th Century. With tv’s getting bigger and slimmer as technology progresses. They are so much better to look at than the old chunky box they once were. Although not as chunky as the past. Our televisions now larger, have become the feature of many a modern day home. Especially sat in front of a panelled feature wall.
Sitting around the tv as a family to watch films or to binge watch that new favourite series, has integrated into a lot of modern family routine. But the conundrum has more or less remained the same: How can we make our tv’s less intrusive in our living space? How does one incorporate their TV into the home in a way that contributes to the atmosphere, rather than detracts from it?
Your television shouldn’t be an eyesore or contrast with a room’s décor. Nor should it find itself lost in an array of “cover-up” ornamentation. One of the reasons we decided to create a tv feature wall in our Sons teen bedroom. We wanted the tv to feel belonged. Especially in a place for sleep.
Now that you’ve decided to display your entertainment system in the style it deserves. The question remains: how to implement it into your home’s design scheme?
There is no shortage of TV wall options. Starting with the simple, no-frills approach and ending with a work of art. Chrome finishes keep your mounted television and speakers sleek and fuss-free. While borders, decorative brackets, and bookcase frame displays all speak to the individual’s tastes and interior values.
However you choose to display your TV, this is your time and space to recline and enjoy some much-deserved R&R.
With sound systems and built in sound systems in new smart tv’s. We have seen the rise of the acoustic panels. Perfect solution for efficient sound absorption, as well as lowering the reverberation time of noise in your space. Gone are the days of only being part of cinema room in grand stately homes.
Acoustic decorative panels for walls and ceilings can easily transform any modern space. The wood panelling is not only decor and sound absorbtion. But doubles up as an effective zoning technique. The effect achieves a free-flowing energy and a comfortable spacious feel. The most popular decorative panel hitting our interior mood boards is the decorative wooden baton acupanels. They are popular due to there easy all ready made panelling from warehouse to home, with beautiful craftsmanship for effect. It really is no mess no stress.
I knew I had to have these acupanel slat panels when it came to decorating our sons bedroom. Made from veneered lamella strips placed on an acoustic felt backing, these panels are definitely built to last. They are easy to install yourself, even for the most novice diner. Instantly enhancing your bedroom, living room, kitchen or office where ever you want to put them. They will look refined in any modern space.
Handcrafted and sourced from the highest quality materials. They fit with any design theme, from natural and scandi, classic traditional, to sleek and contemporary. All the materials used in the crafting of Acupanel acoustic wood panels are environmentally friendly. Using the oceans plastic so your clearing up the ocean at the same time as making a wow statement win your home.
How to create a feature tv wall!
So how did we get started on our sons tv feature wall? The wall we intended the tv to be situated didn’t have sockets or or electric, so we had to get them fitted. We started by getting the wall in preperation to house the tv. We called out our electrician to do this task. As we were using the Sony Bravia smart ready built 4k tv [ad], and connecting that to his playstation. We just needed a couple of plug sockets and a brush plate fitted and didn’t need to fit an aerial.
Our electrician measured out the space and placement for our tv. Always keeping in mind where our acoustic panels would sit. He spent half the day channeling the wiring from a bottom corner socket meaning he created little mess so we didn’t need to re – plaster. Any holes that were made, was covered up by the acoustic panels.
I would definitely say fit more sockets than you need at this stage, and add in coupe for usb connections. You never know as technology grows you may purchase more tv tech in the future. Better to have the sockets ready just in case then having bulky extension leads.

Once the electrics were were in place and the back boxes were installed, we could make a start on the feature wall itself.


Installation of the Acupanel, how to fix them!
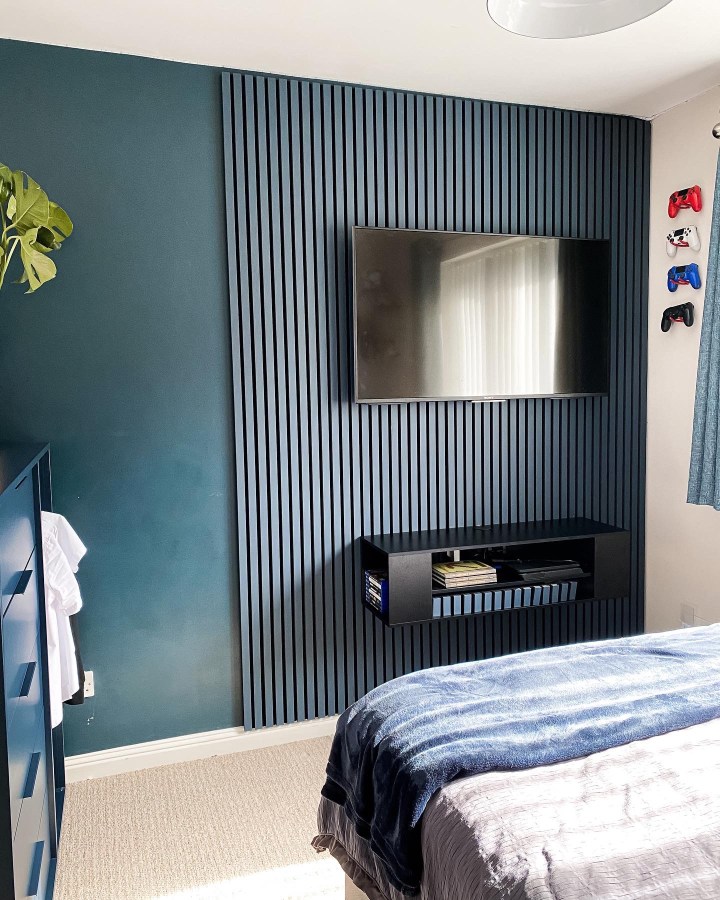
The trend of this beautiful design, is often executed with natural wood tones, like oak or walnut. I have even seen black slat panels. However, I wanted to create something different and unique and opted with the midnight blue acoustic panels, which is a complete match to the infamous farrow&ball haugeblue. This really helped the panels to immense into the wall but the texture and detail of the wooden panels zoned the space.

Measuring the space we needed to order 3 panels. each separate panels measure 240cm x 60cm. 2400mm (H) 600mm (W) 23mm (D) Each panel would create a 1.44m² Coverage.
The first thing we did was to cut the panels to the correct height needed. We wanted the skirting on show so we measured from the skirting board to the ceiling. We then took 10 mm off that measurement, to adjust for the LED strip lighting that is around the ceiling edge. Using a circular saw [ad] and a foldable work table [ad] we cut the panels to the desired length.

Placing the panel against the wall without fixing it, we made sure the panel was the correct length we wanted. (Manoeuvring these panels are a two person job as they are extremely heavy.) At the same time we marked out on the panel where we would need to cut any sections. Due to having sockets on the wall we would need to create cut out sections using a multi tool [ad] in order to place the socket fronts on. This meant we had to be accurate with our measurements and cut outs.

To do this, we measured the distance the sockets were positioned. Measuring from the skirting to the socket and then from the right facing wall. As the socket was a standard size, the measurements was transferred onto the wooden panel ready for cutting. As the saying goes measure twice cut once. Or in our case for complete accuracy we measured six times.

Before perminatly fixing the panes to the wall. We placed the panels to the wall by holding them to check that all cuts were all accurate and correct. Once happy our we covered 50cm of the wall where the panel would be placed with stick like shït adhesive [ad]. We did 50cm so the glue when pressured applied would not spread pass the panel which was 60cm in width.

Fixing the panel on to the Wall and getting it in to position. We then placed screws using a 2mm drill bit and screws that were an appropriate fitting for our wall type. We screwed through the felt backing for extra security. The screws were screwed at top of the panel and bottom to secure in place.
When doing any drilling, ensure you use a wire and pipe detector [ad]to ensure you don not hit any important wires or pipes.
We repeated this process for all 3 panels and double checking all panels were placed inline with each other with no gaps.

Installation of the tv
Now that the acoustic panels were in pride place we could the continue with finishing the electrics and instal the bracket to hold the tv onto the wall.
We covered any gaps between the panel and the electrical components with felt so there would be no gaps or exposure to any live electric components. This will prevent any fire if a fault occurs or electric shock if any fingers get down there.

Our electritrian placed the front sockets on to cover the plastic box plates. We opted for black socket fronts instead of the white plastic counterpart for a more polished finish.

Now that the sockets were installed, we could move on to the installation of the tv wall bracket[ad]. We placed our tv bracket directly on to the panel. But I guess you could if you wanted to place the bracket on the wall and cut your panels to size around the bracket accordingly. Measuring out were we wanted the tv to be hung and marking on the panels were we needed to drill. We hung the bracket directly on the wooden panels itself and not the felt backing. To do that we first drilled a pilot hole into the wooden panel so that the wall screws when used wouldn’t split the wood. Bracket in place we proceeded to hanging the tv onto the bracket.

Another way you could install your bracket, would be to place it on the wall and cut your panels to size around the bracket accordingly. We didn’t want to do that incase we changed the size of the tv in the future so didn’t want a hole in the panels if the tv went smaller.

I love how this tv panelled feature tv wall looks and I hope the above has been helpful when it comes to create your own.
What we used.
- Decorative acoustic panels
- Cable and piping detector [ad]
- Pencil or marker
- Measuring tape
- Set square
- Circular saw [ad] or hand held saw
- Multi tool – viber cutter
- Screws
- 2x double sockets with USB
- 2x hdmi
- Wall screws
- Drill [ad]
- 2mm Drill bit
- Adhesive [ad]
Top tip, when the panels arrive ensure that you store them layed flat until you install so that the wooden panels don’t bow.
Always check the walls for any wiring or pipe work before commiting to any drilling. There is a lot of affordable wire detectors available on the market.
This is definitely a two person job as the panels are rather weighty. The wooden panels are also stapled to the felt backing so make sure when your cutting them to size they don’t move off the felt. You can always re staple them once you have cut them so they don’t move. We didn’t have this problem but it’s something to be aware of.

And when fixing your panels to the wall, make sure you are using the correct screws for your wall type. What screws you us will be determined by the type of wall you are fixing the panels on. For example. We used masonry screws as it the panel was being placed over brick.
If anyone has any questions you can always find me on Instagram I’ll be always happy to help.
Let’s get connected
